Teddy Bear Cake
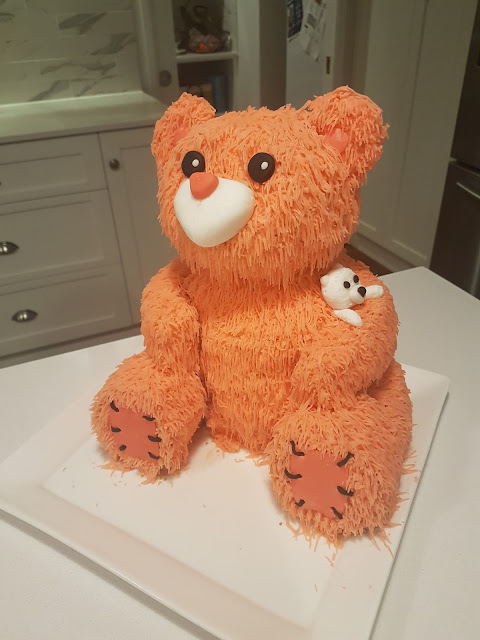
For my daughters second birthday we decided to attempt a Teddy Bear Cake. We've had a Thermomix for roughly 2 years but hadn't used it to make a cake yet (just the batter and icing, can't bake a cake in it!).
So a week before making the proper cake I tried a few Thermomix recipes and found the one below easy to use:
===========================================
http://retromummy.com/2013/08/07/how-to-make-birthday-cakes-in-your-thermomix/
What you'll need
- 250g unsalted butter, room temperature
- 1Tbsp vanilla (essence/extract/paste)
- 1½ cups /320g raw sugar (or caster)
- 4 eggs
- 3 cups/450g SR flour
- 1 cup/250mls milk
- 3 cups icing sugar (or raw sugar if you like)
- 2 Tbsp margarine
- dash of milk
- lollies to decorate
Instructions
- Place raw sugar in TM bowl and process for 10 seconds on speed 9 to make caster sugar.
- Add in chopped butter and vanilla and process for 30 seconds on speed 5, scrape down the bowl halfway.
- Take out the measuring cup and with the machine running on speed 4 pour in the eggs one at a time through the lid. Takes about 20 seconds max.
- Now add in half the flour and half the milk. Process 10 seconds speed 5 and remaining flour and milk and 20 seconds speed 5. The mixture is heavy so scrape down the bowl and make sure the flour and milk are mixing in. I just did this with a spatula.
- Give it another 20 seconds if it needs it. Then pour into lined cake tins. This mixture makes 2 cakes but you could also use a large rectangular cake tin and then cut your cakes from the one big cake.
- Bake in a preheated oven at 180C/350F for about 40 minutes until cooked right through.
- If your oven tends to get hot or the top is browning too quickly and the cake is still wobbly just turn down the heat by 10 degrees or so.
- Now you can make your icing sugar in the Thermomix and do this you would put 3 cups of raw sugar into the TM bowl in 2 batches and process for about 30 seconds on speed 9. I do it in 2 batches and then place it in a large bowl ready to make my icing.
- Place the margarine in your TM bowl and process for 20 seconds speed 5. Now add in about 1 cup of the icing sugar and a dash of milk. Process at speed 5 until it all comes together
- Add another cup of icing sugar and a dash of milk if needed and process again...then add in remaining icing sugar. You want a nice spreadable consistency. Use your spatula to help the icing sugar that is sticking at the top of the bowl.
- If it's too thick add a bit more milk and if it's too runny add more icing sugar. If you want to colour your icing then get it all out of your TM bowl FIRST and place in a bowl and colour using a toothpick to add colour to the icing! Don't tip the bottle near the icing or you'll get too much colour in the icing
=============================================
The next step was to sketch out the teddy design and reverse engineer it to see what cake cuts I needed to make the teddy. I ended up with:
- 4 x dome cakes
- 2 x flat circle cakes
That sounds a bit confusing so here's a picture:
Cooking Dome Cakes
Being self taught I had to try a few approaches to evenly cooking a dome cake with a flat top.
My final solution was to put the dome bowl with batter into a larger bowl which had room temperature water in it. This allowed the outside of the cake to remain cool and cook the cake evenly.
Just placing the dome in the oven causes the batter on the outside of the bowl to cook quickly while making a mountain in the centre of the cake.
When taking the cake out the dome bowl I found that one of the cakes could do with a little more cooking so placed it back in the warm (not hot) oven upside down (dome up) for a touch up.
Assembly:
Now for the fun bit, building!
- Place some icing on the plate to glue down the bottom layer.
- Cut a little off one of the domes so it has a flatter 'top' then place the dome at the bottom. Place icing between each layer of cake as glue.
- Cut out and place a ring of cake as the 'tummy'
- Place another dome above the 'tummy'
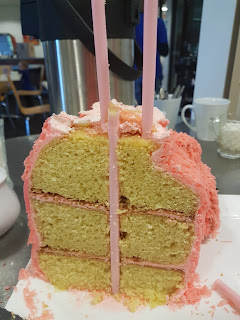
- Use a dowel or something similar (I used Ikea straws) and skewer the body to keep it upright. Keep in mind that the dowels need to be close to the centre of the cake as you'll be shaping the cake later and cutting into the sides.
- Cut little legs from the scraps on place them on the side of the cake. Ice in. Same with feet.
- Place the final two domes on the top as the head and skewer these in place. Be mindful again of keeping the dowels fairly central to allow carving/shaping.
Some of my dowel locations (after serving the cake):
Now it's a bit of a judgement call on how you would like your bear to look. Cut into the forehead, top of tummy, shoulders etc to give the bear the dimensions you would like.
Ice over the whole cake and stick on the arms and feet.
I let the cake sit for about 30 minutes then smoothed over the icing but wasn't overly concerned as it would all be covered with 'fur' later.
At this point I realised that I hadn't thought of the ears! What to do... After rummaging about the pantry I found 3 old Jatz biscuits so shoved two of these into the head and iced them up haha.
I wasn't sure if I should ice the fur on next or do the nose first. Ended up on making and adding the nose next then put the fur on which I think was the correct idea.
Nose/Mouth
Really this is all your judgement call on how you would like it to look. I was loosely basing this off a teddy in the house.
Icing
O boy, this took a loooooong time. I haven't iced before so I'm sure there's a better way to do this but essentially I mixed up big batches of icing using a set colouring ratio EVERY time so that each batch had the same colour. Wouldn't want the fur to have different tones in spots!
Sorry, before icing I placed a patch on the feet and my wife kindly suggested when I was done that I should have placed a big patch on the tummy to make the icing easier. THIS IS A GREAT IDEA. Wish I received that tip before I spent hours 'furring'...
I used a grass tip to make the fur. It's a bit fiddly as I needed to bond the icing to the bear then pull and twist the nozzle just the right way while applying the right amount of pressure to the piping bag. It took a few attempts but managed to work out a plan.
It was a very cold evening so the icing kept solidifying when I was piping and blocking up the tip. Every 5 to 10 minutes I needed to disassemble the bag, place the tip in a mug of hot water, clean out the tip, reassemble and continue. Please let me know if you have any tips!
TIPS:
- Start with the bottom of the cake and work up so that the hair layers over older fur. It looks better.
- Start with the hard to reach places. Try to think a few steps ahead to think where the tricky spots will be. Having said that, you could be making other spots tricky by icing a particular spot.
- Use items to cover the cake to reduce icing. Maybe a scarf, hat, more patches?
Eyes:
Very easy to do. Roll out a black ball of fondant and squash into a disk. Repeat.
Do the same with a small white piece to place on the black disk. Have some fun with the location of the eyes, should the bear be looking up, to the side, cross-eyed even??
Place on the cake.
It was really easy to make and I used a toothpick to scratch out 'fur' similar to the Christmas decoration in an earlier post.
Result:
I hid the cake in the pantry hoping to reveal it to my daughter with the family around but unfortunately she spotted it the next morning. Her reaction made the whole project worthwhile :) Her eyes lit up and she shouted "BEAR BEAR" then tried to give the cake a hug not realising it was a cake.
Sadly it wasn't captured on camera but I think the whole house heard her!


Comments
Post a Comment