Finally one of my children asked for a Starwars cake! I nearly had a Storm Trooper request a few years ago but he changed his mind. He asked for a truck cake then a Star Wars cake and finally settled on a transport cake from Star Wars, the legendary Millennium Falcon.
Once again used the go-to choc mud cake recipe. It's great for carving. https://dadmakingcakes.blogspot.com/2019/07/chocolate-mud-cake-super-easy-yummy-and.html
Found schematics/plans online and resized them on my computer until they fit the cake tins I was using. Decided to make one circular cake and one square cake. For a change I wouldn't use baking strips (https://dadmakingcakes.blogspot.com/2017/08/how-to-bake-cake-with-flat-top.html) on the circle pan as I wanted the cake to dome like the Millenium Falcon does.
Let the cake cool then cut the pieces using the template
Once I was happy with the measurements it was time to stick all the pieces together using icing and crumb coat the cake.
Into the fridge goes the cake to firm up the icing.
Once this is done it's time to add the fondant to the cake.
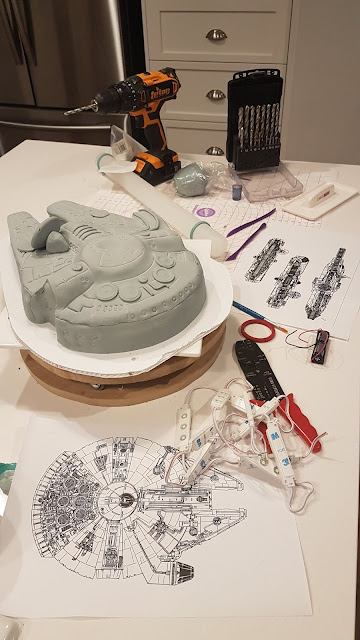
Mixed up a big white packet (1kg) fondant into grey and added medium thickness strips to the sides and a big white piece of fondant to the top and back to make the required lumps and bumps.
Then rolled out a large thick piece and placed it on the top.
Carefully smoothed the fondant over the structure and tried to make the edges nice and tidy.
Given we are making lines all over the cake I wasn't too worried about the seams being perfect.
The next step is to draw in the panels on the surface.
And now to make the exhaust vents and other little pieces that go on the cake. Just using various items around the kitchen or even kids toys to make this. This cap is from my daughters hair spray haha.
And here's a picture with the pieces on it.
Now to add some electricals to the cake! This is my first time doing this so I was excited :) The idea was to add lights to the engine bay:
Built a mount using cardboard secured with toothpicks (surprise! I use toothpicks all the time).
The lights are 12V LED's so used two 6V batteries to make it work.
Then it was time to paint (one of my favourite parts!). It makes such a big difference once some paint is added.


Comments
Post a Comment